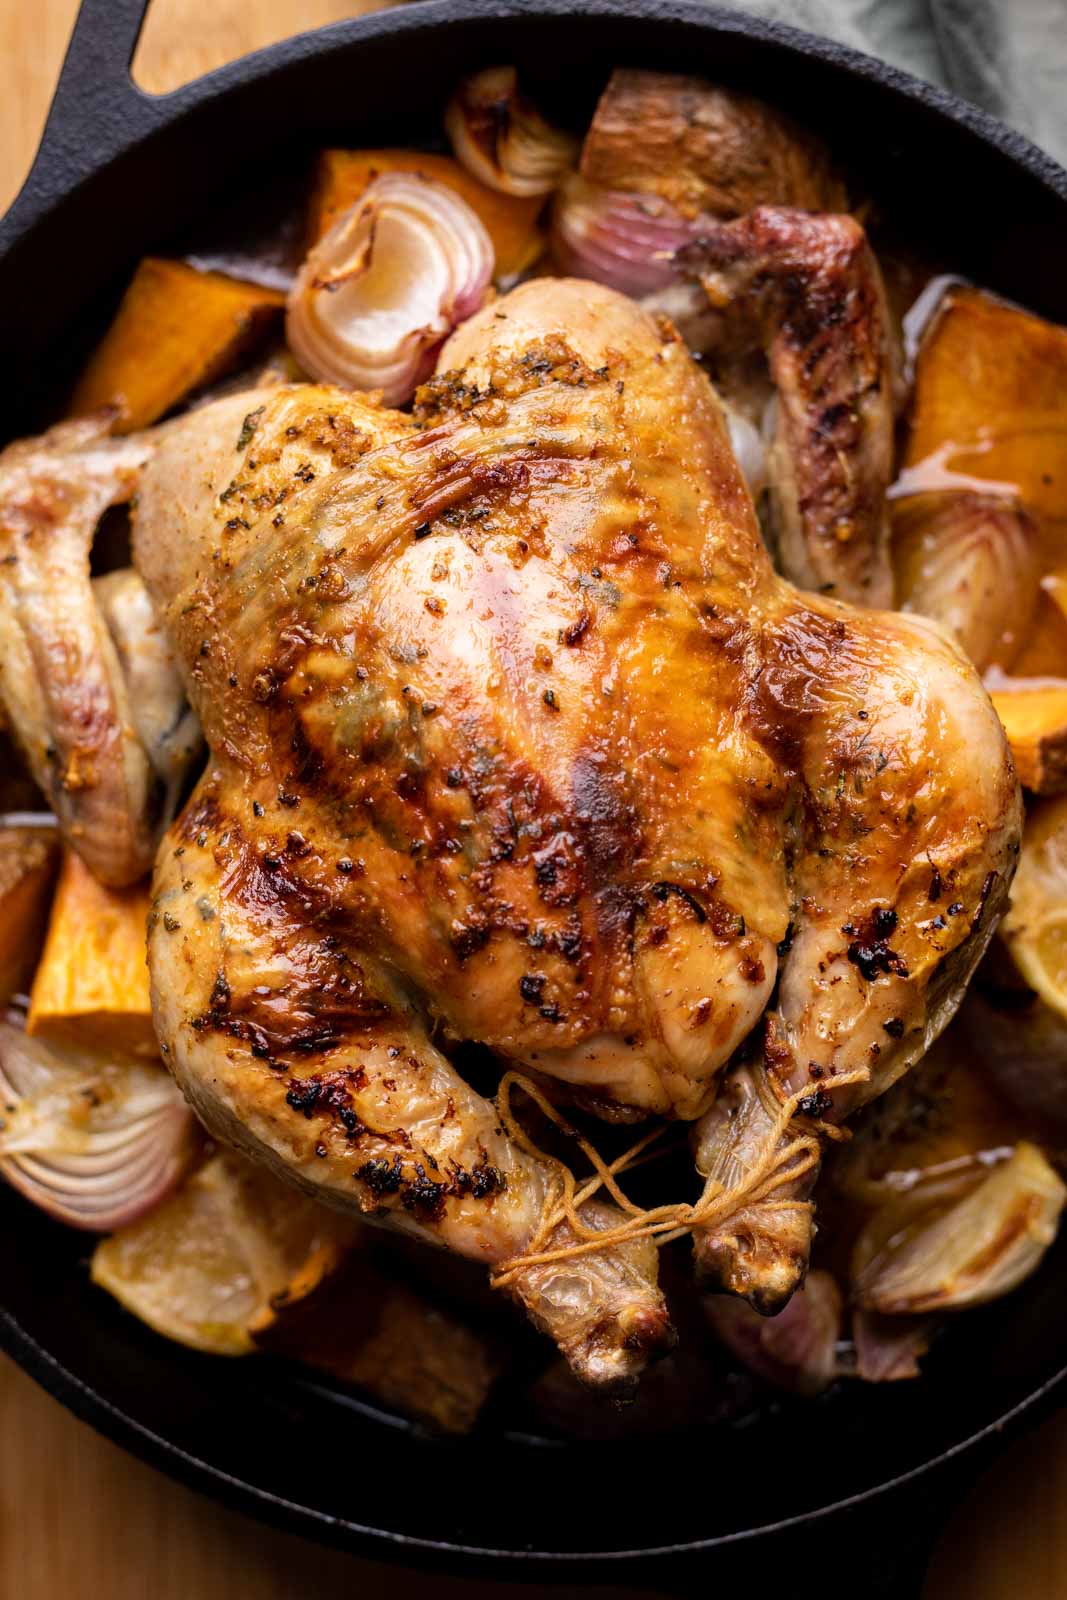
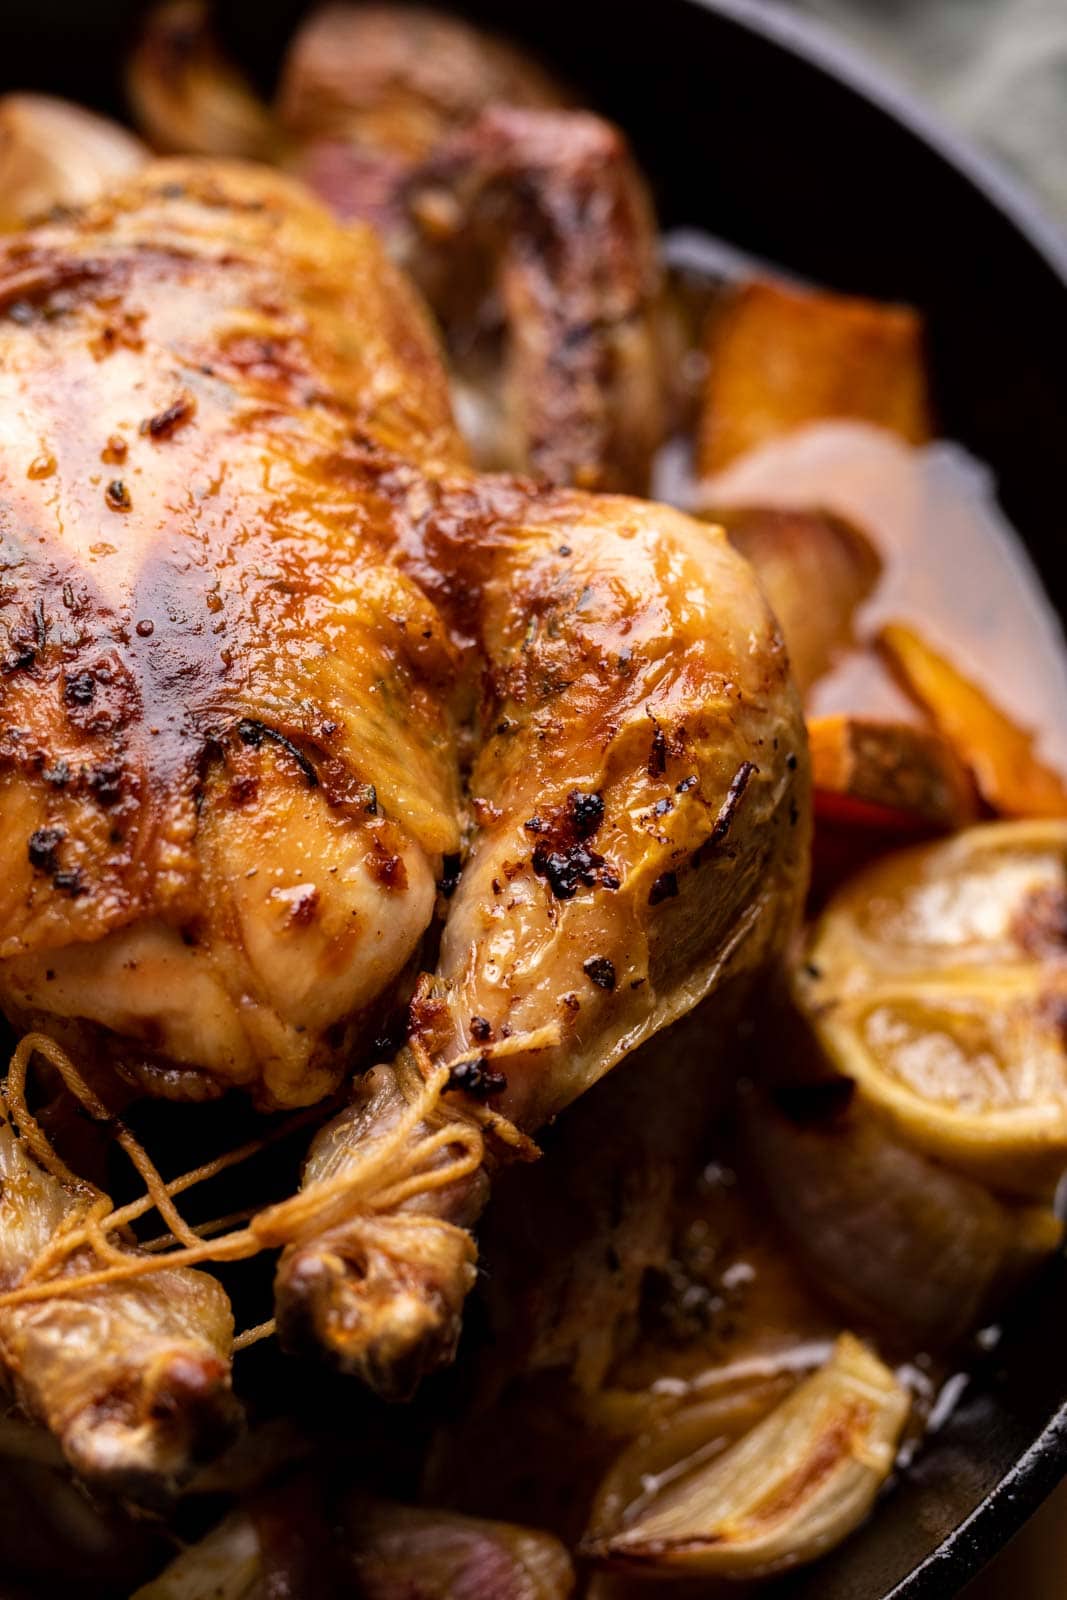
This whole roasted herb garlic roast chicken has the perfect crispy chicken skin and tons of flavour from herbs, garlic and butter. This post includes detailed instructions on how to roast chicken, make a flavorful herb garlic butter, a delicious jus, as well as tips to prep and carve a chicken.
If there’s one recipe my family always requests I make every Christmas, it’s this Herb Garlic Roasted Chicken. It makes for such a delicious meal; super satisfying and has all the Christmas-y vibes. This is a complete meal with roasted veggies and gravy made from the leftover meat juices, which means you don’t have to cook separate dishes when hosting and nothing goes to waste!
This recipe and it’s steps might feel long and complicated, but don’t let that intimidate you. I’ve explained each and every step in detail so that it’s simple to follow. You can also take a look at the video below!
Jump to section: Herb Garlic Roast Chicken
Herb Garlic Roast Chicken Ingredients
Chicken
- Chicken – Whole, with giblets and neck removed
- Lemon – halved and placed inside the cavity to add freshness and aroma
- Rosemary sprig – tucked inside the chicken for subtle herbal flavor
- Olive oil – to brush the chicken for a golden, crisp roast
Marinade
- Butter – adds a really nice flavor and aroma
- Garlic – minced, to infuse the chicken with a deep, savory flavor
- Herbs – finely chopped sage, rosemary, and thyme add a lovely earthy aroma and flavor
- Paprika and pepper – for a hint of spicy kick and seasoning
- Lemon zest and juice – for brightness and tanginess
Vegetables
- Onions and potatoes – for flavor and texture
- Garlic head – halved
- Chicken stock – poured into the pan to keep the roast juicy and form the base for the gravy. I don’t recommend replacing this with water
Gravy
- Flour – to thicken the pan juices after roasting, turning them into a rich, savory gravy
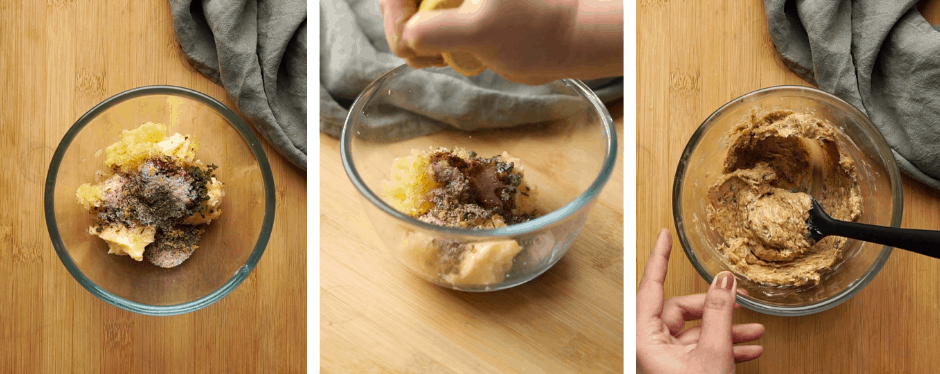
How to Make Herb Garlic Butter
The herbs we have used are thyme and sage, and some people also like to add parsley. They are not overpowering and they beautifully complement each other. We’ve added some paprika and ground pepper for some heat. My favourite and most underrated ingredient is lemon for some citrusy zing! Everything is mixed with butter – this is such a simple marinade with clean flavours.
We use this herb butter under and on the skin which is how this roast chicken recipe is packed with flavour.
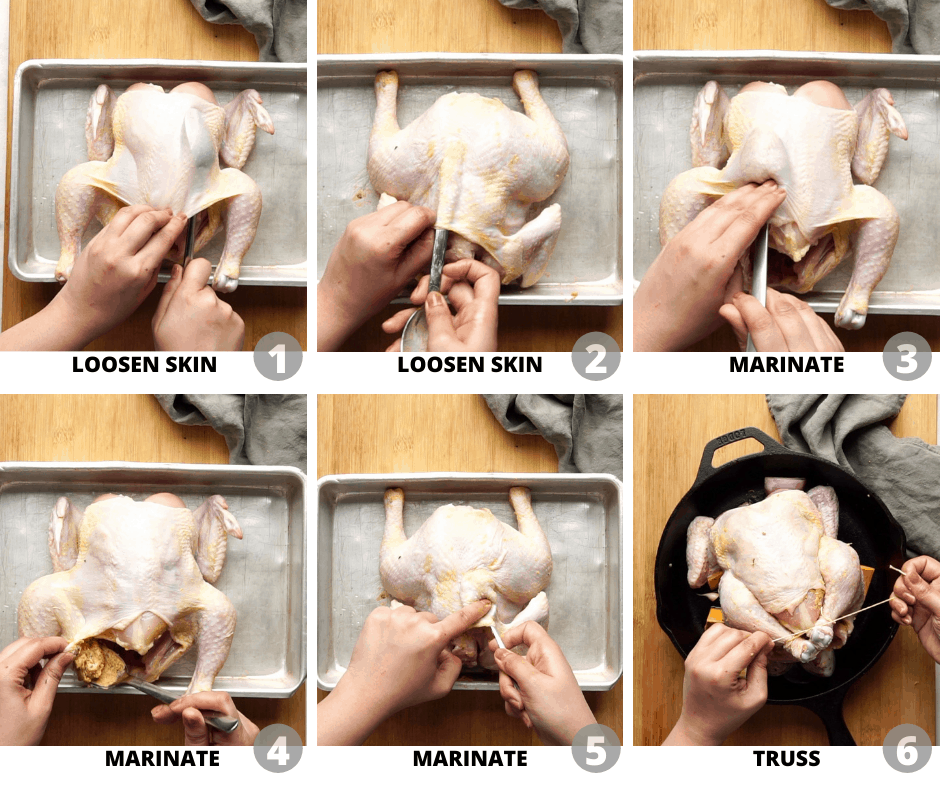
Three Important Steps For The Best Crispy Skin Roast Chicken
- Loosening chicken skin: The key to getting that crispy skin on the roast chicken is to loosen the skin of the chicken before marinating it. The skin on the chicken traps all the juices of the herb garlic butter and allows the meat to absorb flavours really well. It makes the chicken really succulent and also gives a nice crispy skin on top. Be as careful as possible so you don’t tear the skin. Don’t skip this step, otherwise you’ll end up with a fab looking chicken on the outside but with bland meat on the inside.
- Marinating the chicken: The advantage of having loosened the skin of the chicken is that you can not only put the herb garlic butter over the chicken, but also under the skin and inside the cavity! This actually creates a double whammy of flavours! We recommend marinating the stuffed chicken overnight in the fridge for max flavour!
- Trussing the chicken: Trussing is basically when you tie up the wings and legs of a chicken, or any bird, before roasting it. For this roast chicken, we haven’t trussed the bird like it is traditionally done. We’ve just tied the legs to make it more presentable! Tuck the wings of the chicken behind the neck. This prevents the wing tips from burning as the chicken roasts.
How To Cook A Whole Chicken
I like to use a cast iron skillet to roast the chicken and veggies, but any roasting pan will do. Elevate the chicken (breast side up) by placing it on top of the veggies – this way the meat juices will easily drip down into the pan. A drizzle of olive oil on top ensures it gets that golden colour. With me so far? Great job! We’ve added chicken stock and a few sprigs of rosemary to the pan. And we’ll use these reduced juices to make a delicious jus. Yum yum!
Richa’s Top Tips
- If your chicken was refrigerated, take it out of the fridge 60 minutes before you are ready to roast it to bring it to room temperature. This will ensure even cooking.
- Preheat the oven at 200 degrees C. Preheating helps to cook the meat evenly.
- Bake the chicken at 200 degrees C for about 25-30 minutes
- The cooking time will differ based on the size of the chicken. The general rule is 25 minutes cook time for 500 grams of chicken. Our 1 kg whole roast chicken took about 50 minutes to cook.
- After baking for 30 minutes, baste the chicken – with the rendered fat and juices of the chicken and veggies in the bottom of the pan. After basting it, put the chicken back in the oven for another 20 minutes.
- At this point, if the skin is browning up too quickly, place another tray on the rack above the chicken. This will prevent the heat from hitting the chicken skin directly.
- When the oven temperature hits 75C or 165F, OR when you see those meat juices running clear, that’s when you know that the chicken is done.
- Rest for 10-15 minutes before carving
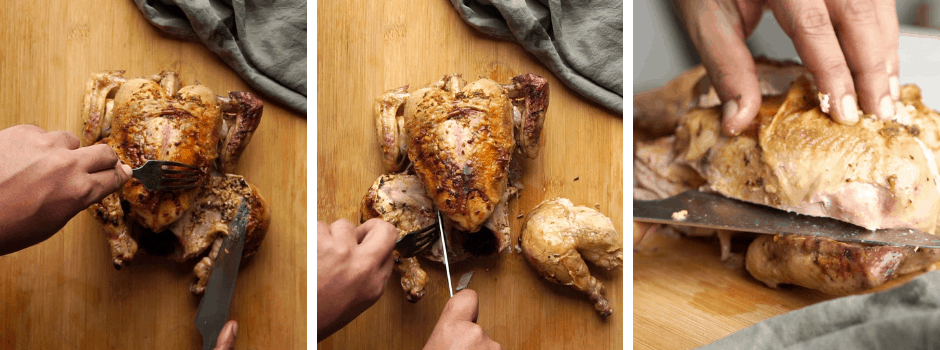
How to Carve Chicken
Now it’s carving time! Cut off and remove the twine completely. Use a fork and a meat knife and cut between the joints of the leg and body. If your chicken is cooked perfectly, it should cut right through without any hassle. Next, keeping your hand for support, horizontally slice off each breast of the chicken. The wings can be taken off next. And finally, you can shred any extra meat off the carcass. The carcass is perfect to make stock.
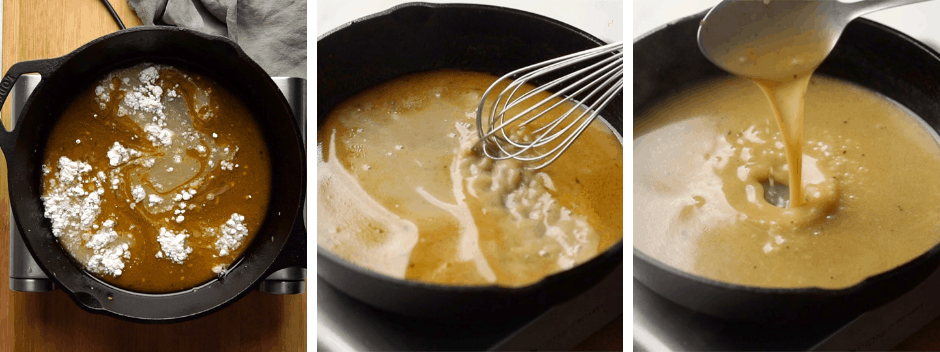
Roast Chicken Gravy
Usually the gravy is made with a roux of flour and butter and the meat juices. We’ve taken a shortcut by directly whisking in flour. (Just saving you and me a couple of extra steps!) The jus will turn out to be a nice golden brown and saucy. It’s my favourite part of the dish coz it’s like all components of this dish rolled into one! Plus we don’t want to waste a single bit of flavour in that pan. Serve this jus in an elegant piece of crockery, and pour it onto the chicken pieces in front of your guests. How’s that for presentation? 🙂
Frequently Asked Questions
Yes! Use about one-third the amount since dried herbs are more potent. Rub them between your fingers before adding to release flavor. Note: the taste will be deeper and slightly earthier than fresh herbs.
The most reliable way is to check the internal temperature with a meat thermometer. Insert it into the thickest part of the thigh (without touching bone); the chicken is done when it reaches about 75°C and the juices run clear.
Serving Ideas
- Serve the carved herb garlic roast chicken with the roasted onions, sweet potatoes, and garlic from the pan, plus a generous drizzle of the lemony pan gravy.
- Pair with simple sides like mashed potatoes, buttered green beans, steamed veggies, or a fresh green salad to balance the richness.
- For a more casual meal, serve with crusty bread or garlic bread to mop up all the buttery, herby juices.
Customisation ideas
- Swap sweet potatoes with carrots, regular potatoes, or parsnips for a different roast veggie mix.
- Change up the herbs by using Italian seasoning or adding oregano and parsley if you do not have sage or thyme.
- Add a touch of heat with chilli flakes or cayenne in the marinade, or a bit of honey for a sweeter, caramelised finish on the skin.
This herb garlic roast chicken is the kind of recipe you can come back to on special occasions, but it is comforting enough to make for cozy weekends too. With crisp skin, juicy meat, and plenty of roasted veggies and gravy on the side, it is simple enough for everyday cooking but impressive enough for guests.
If you make this recipe, don’t forget to send me pictures over on my IG @my_foodstory. I love seeing your recreations and chatting with you guys!
Watch How to make Roast Chicken Recipe Video
Prevent your screen from going dark
-
Add all the marinade ingredients to a mixing bowl and whisk together to combine. Use the back of a spoon to gently loosen the skin. Turn over the chicken and repeat the process using the other end of the spoon. Use the spoon to insert marinade underneath the chicken skin. Massage the chicken and spread the marinade evenly. Remember to add butter in the cavity as well. Rub the remaining marinade all over the chicken. Cover the chicken and rest for 2-3 hours or overnight.
-
Stuff the rosemary sprig into the chicken cavity along with half a lemon. Tie legs together with kitchen string.
-
Lightly grease a roasting pan. Mix the sweet potato, onion, and garlic in a bowl. Place some of the vegetables in the center of the roasting pan. Place breast-side up on top of the vegetables in the middle. Place the remaining vegetables on the sides of the pan. Tuck the wings underneath the chicken as they cook faster and we do not want to overcook them. Rub the chicken with some olive oil and drizzle some over the vegetables as well. Add half a cup of chicken stock to the pan.
-
Preheat the oven to 200C. Roast in the oven for 45-50 minutes. baste using the pan juices half way through cooking time. Remember when cooked, juices run clear when chicken thigh is pierced with a skewer. Internal temperature should read 75C.
-
Remove from the oven and allow it to stand for 10 minutes before serving. To carve the chicken, first cut out the legs. Then proceed to cut the breast out carefully, seperate the wing tips and then remove the meat from the cavity area.
-
Remove the vegetables from the roasting pan and move it to a serving platter. Add 1 tablespoons of flour to the pan and whisk it with the pan juices. Bring this mixture to a boil over low heat till the liquid thickens up to make a gravy. Add up to an additional quarter cup of stock if necessary. Serve hot along with the chicken and vegetables!
- The chicken I used was approximately 1.2 kgs. This took 90 minutes at 220C. The time may vary depending on your oven’s capacity and the size of the chicken.
- Use chicken with skin on as the skin gives it that crispy roast texture.
- Remember to marinade the chicken well. Apply the marinade in between the skin and meat. These pockets can hold ample amounts of marinade and help get the flavour all the way into the meat.
- Knowing when the chicken is cooked: The internal temperature of cooked chicken should read 165F/73C. The most handy way to tell would be using a meat thermometer. If you do not own one, you can cut and check the juices. If the meat is white in colour and the juices run clear that means the chicken is cooked. The meat or the juices should not have a red/pinkish hue.
- Getting rid of juices Tip 1: A trick to getting rid of the juices if you absolutely prefer it that way is to remove the chicken once its cooked and place the sheet pan with veggies back into the oven on the top rack. Turn the broiler or the top element on and let the veggies broil for 3-4 minutes. This will get them nice and crispy and evaporate all the juices in the sheet pan.
- Getting rid of juices Tip 2: Another way to get rid of the juices is to sear the thighs on both sides in a pan first before placing them in the oven. This can help lock in the juices so that you have less liquid when it comes out of the oven.
Calories: 494kcal, Carbohydrates: 29g, Protein: 19g, Fat: 35g, Saturated Fat: 14g, Cholesterol: 101mg, Sodium: 848mg, Potassium: 612mg, Fiber: 5g, Sugar: 7g, Vitamin A: 11847IU, Vitamin C: 30mg, Calcium: 74mg, Iron: 2mg
This article was researched and written by Urvi Dalal.